
There are many reasons why printers occasionally misprint some t-shirts during the print run. (Not that anyone in this industry will publically admit to making any mistakes. We are all perfect you know.) Hopefully, none of your staff is doing it due to incompetence, which probably would be an entirely different article.
This one though, is going to center on a few problems that could pop up, that if fixed, could allow you to ship that problematic “misprint” shirt with the order. Some misprints are complete disasters, and you certainly can’t send those. Those go instantly into the test print pile, or are used to clean the floor later.
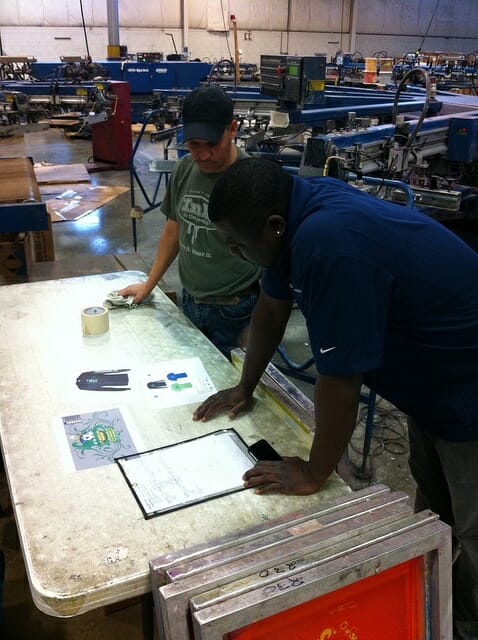
Part of any shop’s quality control program has to move beyond just identifying problems, and move into fixing them. Here are some tips for repairing some shirts to get that problematic order to ship complete:
- Fuzz balls or Thread Strings. A piece of lint or a stray thread gets stuck on the underside of the screen. After the squeegee stroke, there’s a hole or thin wavy line in the print that is pretty noticeable. If your catchers are as well-trained as ours, they find these small inconsistencies and take steps to correct them.
- First, make sure you tell your printer to stop printing and correct the issue so the remainder of the production run does not have this problem.
- To fix the affected shirts just daub a little ink on a piece of cardboard. Use a toothpick to gently smear the ink onto the shirt in the area. Blend it, blend it in good… Send the shirt down the dryer.
- Take a look around your press area. If your equipment has not been cleaned for some time, you might consider taking a few moments to clean your press and surrounding area. Also the lint challenge gets worse if you use spray tack, as the adhesive gets into the air causing all sorts of issues. Try switching to a water-based adhesive that can be carded onto the platens. Also, if your print crews are slobs, this is the main cause of the fuzz ball problem. Owners: This is a floor supervisor management problem. Make sure you have a word with your leaders.
- Distorted Circles or Squares. Speaking of spray tack…too much applied to the platen can cause the printed image to distort when your press puller yanks it off the platen. That left chest circle image is now egg-shaped. That square is now a trapezoid. Yikes!!
- Set aside all of the affected shirts. Usually it’s limited to a few, as it normally occurs just after the platen adhesive is applied (too generously).
- What’s happening is that the fibers of the shirt have been stretched in the direction of the incredible force applied to get the shirt fabric off of the press.
- To correct the challenge, if you use your hands to stretch the fabric in the opposite direction that you see with the shirt, you can pull the image back into shape with a few tugs. Eggs become circles, trapezoids become squares.
- To increase the chances that this problem won’t happen again, have the press operator and puller help fix the challenge. Don’t just leave it up to the catcher. Getting them involved in repairing the shirt and explaining how it happened will educate them on the cause and effect on how they are running the press. This challenge is entirely preventable.
- Also, on the market are various lower tack adhesives to use. These are especially valuable for shirts that don’t have a lot of fabric heft, such as burnout or some thinner fashion t-shirts. These are more prone to having images distorted than a normal t-shirt.
- Board Marks. This is when the ghost image of the shirt board shows up on your t-shirt, mostly due to a combination of heat and pressure. It’s most visible on dark shirts, and this is avoidable with proper care during production. Suggested methods of reducing board marks in your shop:
- Round off the corners of your squeegee rubber.
- Reduce squeegee pressure to as little as possible. Remember, you are supposed to shear the ink through the screen not drive it into the shirt like a nail. The answer to everything on press isn’t more pressure!!
- Minimize flash cure temperatures. You only need to gel the ink, not cure it.
- Check your squeegee length. Use squeegees that are just a little wider than your image if possible. Never use squeegees that are wider than your platen.
- Scorch Marks. Mostly on white shirts, you may have occasional light brown or tan scorch marks appear on shirts. Check your heat and dwell times on your flash units and the heat setting on your dryer. T-shirts aren’t pizzas; you just have to cure the ink so watch your temperature!
- You can sometimes take the scorch marks out with hydrogen peroxide on white shirts. Use a properly labeled spray bottle, and mist some hydrogen peroxide on the affected area of the shirt and allow to dry. This can sometimes take out the scorch mark, but depending on the severity of the challenge, isn’t 100% effective.
- Using the Spot Gun. As ubiquitous as a squeegee in a t-shirt shop, the spot gun is a pretty common sight. If you don’t have one of these miracle cure devices, you should look into it. They are essentially power sprayers that focus a cleaning fluid with a tremendous force through the shirt to remove ink, stains, dirt, and other weird splotches on fabric. Be sure your staff uses proper Personal Protection Equipment (PPE) and check your SDS sheets for chemicals, as usually the better the chemical works the more harmful it is to people.
- The most common use of the spot gun is to blow out ink deposited on shirts from pinholes. These are tiny spots in your emulsion that are missed by your screen room during their quality control step. On press, these develop over time and small dots of ink will appear on your shirts. These are caused usually by dirty glass on your exposure unit, or debris on the film positives. If your shop switches to a Computer to Screen system, these problems are eliminated overnight.
- Dirty shirts. Sometimes the shirts have dirty splotches, oil spots, or other weird spots on them. More often than not, this is caused by the condition of your press or the work habits of your crew. Believe it or not, you can’t eat Cheetos and load a t-shirt press at the same time. Yes, I actually just wrote that…as I’ve had to say that to a printer before.
- Rough Ink. Your print impressions should have printed ink deposits that are smooth to the touch and have a nice soft hand. So what do you do if the ink is rough or textured like an old cobblestone street?
- After the shirt is dried, try using a heat press with a smooth silicone mat and apply some heat and pressure to smooth out the ink.
- While it’s easy to blame the ink for this problem, the root cause lies somewhere in the mechanical method of printing. Every problem is different, but I would look to screen tension and off contact as the main culprits for this type of problem. Properly made screens with good EOM (Emulsion Over Mesh) should allow the ink to be deposited into the opening in the screen during the flood stroke. The squeegee just shears the ink in the opening and deposits it onto the surface. If you have good screen tension, level platens and sharp squeegees this should allow you to print incredibly smooth, opaque ink deposits.
- We Forgot – The Case of Some Missing Art. Occasionally, I’ve seen instances where the art department left off something in the seps, the screen room blocked out a chunk of the art, the print crew taped off portion of the art fixing a pin-hole or registration mark, or other “mysterious” reasons why a detail or item on the art was left off. Worse, the print run happens and the challenge is discovered too late. What do you do now?
- Depending on the situation of course, you may need to make a separate “fix” screen that just has that one tiny bit of art that was left off.
- Your best printer, taking their time, can load the shirts onto the platen and line up the already printed shirt with the newly added fix. This takes some skill and special care. And lasers. If you haven’t bought lasers for your shop yet, get in your car right now and go down to your hardware store and buy several sets. These project thin red lasers lines down onto your platen. You can use these to line up the screen fix with the printed shirt focusing on a few landmarks on the printed shirt so each shirt can be loaded exactly. (We use them for lining up pocket tees for ordinary jobs too).
- Does this work all the time? No. Will it take the entire afternoon to fix? Yes. You will get nothing else accomplished while you try to save these shirts. However, that’s better than repurchasing them any day. Or the embarrassment of leaving off a key detail in the print and having to explain that to the customer.
Final thoughts. While some problems occur beyond the control of your staff, a good many are due to employees not paying attention, shop cleanliness, improper training, and just ordinary focus on detail. It’s up to the leaders of your shop to enforce some general rules on housekeeping, promote training, and build your quality control program. Make sure you keep a log on these problems, and if you can track down the root cause of the issue. Remember the tried and true maxim, “You can’t manage what you don’t measure”. Shop managers should be actively working on reviewing these challenges constantly and developing policies and procedures to eliminate them.
What are your secret tricks? These are just the ones that came to mind for me, but if you have any that I’ve missed please share!


15 comments
Rob Marcroft
Sharpies can fix just about anything wrong in a print shop!
There is a running joke i have with an art director I used to work with years ago because I got so mad at a set of seps that came back and some of the information kept coming up missing. I grabbed a sharpie and ended up drawing the missing information on the screen and put the film on top. Easily (but ugly) fix!
After that he came out onto the floor and I was fixing about 3 dz shirts that had a fuzzball void in the black with a sharpie. Later he came back and caught me fixing a film that someone had scraped too much off of an area.
Anyways, after that day whenever there was any issue he just said “Let me grab my sharpie” “What do you want me to do? Grab a magic sharpie?”
You get the idea…
atkinsontshirt
Sharpies Rule!!! -M
Chris Corley
Love it! These are all great learning points for anyone in the industry, especially those with less experience. I learned a few things from this post and I’m sure many others will too. Quality control is essential at every step of the way in this industry and as long as you “measure” every step, identifying the point of failure is much easier. Thank you for your expertise and insight!
atkinsontshirt
Thanks for reading Chris and taking a few moments to leave a comment. Awesome! -M
Josh
I am a QC manager at a T-shirt printing company. I have only been in the business for 15 months, but I have definitely used all of these fixing techniques, stretching plenty of warped prints back into place just yesterday. I have found it useful to train all of the QC employees in these common techniques, but often find myself fixing the toughest issues by coming up with slight variations and tricks. One example is the issue where you have only a small portion of rough print on an image, but the garment type (zip-up, tank, pants) can’t easily fit flat on a heat press due to seams or zippers. An easy solution is to send the garment down the dryer and immediately press a small smooth surface, such as a hang-tag, over the rough area while the garment is still hot. This will fix the small issue without even having to worry about entire prints being smoother and shinier than the rest.
There are, or course, frustrating issues that seem to have no fix, such as certain rust or grease stains that won’t spray out, or small holes in the shirts. Have you found any miracle solutions to these small, but frequent problems?
Justin
Just curious as to what lasers you are buying from the hardware store? The only laser alignment systems I’ve found for printing are super expensive and not found locally.
atkinsontshirt
Justin – thanks for reading and responding. I’ll try to dig up where we purchased ours. -M
Garrett Kaule
There is nothing worse than seeing misprinted shirts in the test print bucket. I printed 100 tees and they were all acceptable with a one color print on the front.. Client accepted them and then 2 hours later stopped payment on the check and freaked out claiming there were all crooked. I questioned myself for so long and got so upset I refunded her and threw the shirts in the dumpster. I later found out her business partner didn’t approve the shirt order… Hence they couldn’t cough up the money so they screwed me and threatened to take me to court!
atkinsontshirt
Garrett – thanks for commenting. You are so right, sometimes when customers complain about a problem, there are other reasons behind the complaint. Do your homework, and make sure you get the shirts back. Most people are reasonable, and there are industry allowed tolerances for things. When do you call a client’s bluff? Hard to say, but in the end is it worth the hassle – probably not. -M
Rick Roth
You forgot the best fix that is the only thing that really works on misprinted t-shirts – get them out of your shop as fast as possible so they don’t depress you, and move on to making money on a new order.
Seriously, a good list of things to do the few times you can do something about the problems. However, I do all too often see people spend a great deal of time and money trying to fix something that is just going to look crappy in the end.
atkinsontshirt
Rick – totally agree. The best fix is to not have the problems to begin with…however, that order has to ship complete, so what are you going to do? Thanks for commenting!! -M