Screen Tension.
What’s ironic about this industry that is called Screenprinting is that so many shops completely ignore the screen part of screenprinting. It’s funny because it isn’t like this is some sort of deep, dark, industry secret.
Yet, I’ll bet at least half the people reading this article (or need to read this article) either don’t own a tension meter or never use it.
True Story About Screens
Some time ago I visited a shop to help them out with some process and workflow efficiency points. When I walked through the front door, the production manager was screaming at the artist. You could cut the drama in the air with a knife.
“Your separations suck! Nothing ever lines up! Do you even know what you are doing?”
But, I’ve seen this movie before.
“Hold on”, I said. “It isn’t the seps. It’s your screens. Do you guys have a tension meter?”
Tension Meter Archeological Dig
They did. It was buried underneath a bunch of junk in the back corner on a shelf. The clamshell case was coated with dust and t-shirt lint.
Probably like yours.
We dug it out, and I calibrated the meter using the thick chunk of glass that comes with the set. The production manager brought the screens over. All were static, aluminum 23″x31″ frames. Common.
The table was cleared off and the tension for each of the four screens was measured.
The best tension of any screen in the group averaged out to about 16. The lower left corner of the underbase screen was under 11.
Here’s an image of the actual corner in question.
“We Don’t Have Time To Measure Tension”
This is why that job wouldn’t register.
It’s like trying to build a house on top of quicksand. There isn’t enough foundational support to do the job right.
So, being the curious guy I am, I asked the production manager why they didn’t measure the screen tension. His response:
“We don’t have time to measure”.
But, they did have time to spend an average of over ten minutes a screen a day trying to get jobs to register. Not to mention the previously discussed finger wagging drama.
It is a strawman argument.
Why Does Tension Matter Anyway?
Look, I know this is a fairly boring subject. People in this industry normally want to talk about presses or equipment. Those are sexy.
Screen tension?
It uses numbers. Math.
“Oh my gosh, measuring?”
It is a step easily forgotten.
Hence, why the tension meter was locked away in a plastic case under a bunch of stuff on a corner shelf out of the way.
But what if I told you that screen tension was a secret way that your shop could make more money?
Would the enticement of a truckload of cash make it more interesting?
Let’s take that apart for a minute and I’ll explain what I mean.
Screen Tension 101
Your screen mesh is comprised of threads that run perpendicular to one another. One set is the Warp, and that runs vertically. The other is the Weft, and that runs horizontally.
Mesh count is the term used to describe the number of threads that are contained in a square inch. A 110-mesh screen has 110 threads per square inch, while a 230-mesh screen has, you guessed it, 230 threads.
This is important because the higher the mesh count of the screen, the smaller the openings are between the threads. This factor determines how much ink can pass through the screen and onto the shirt.
For static frames, the mesh is pulled in all four directions across the frame and glued down with a special adhesive. Retensionable frames have a built-in system for stretching the mesh using a table jig and special wrench tools to tighten the mesh within the frame without glue.
Either way, you want the mesh to be evenly tensioned and locked into place on the frame.
Measuring Tension
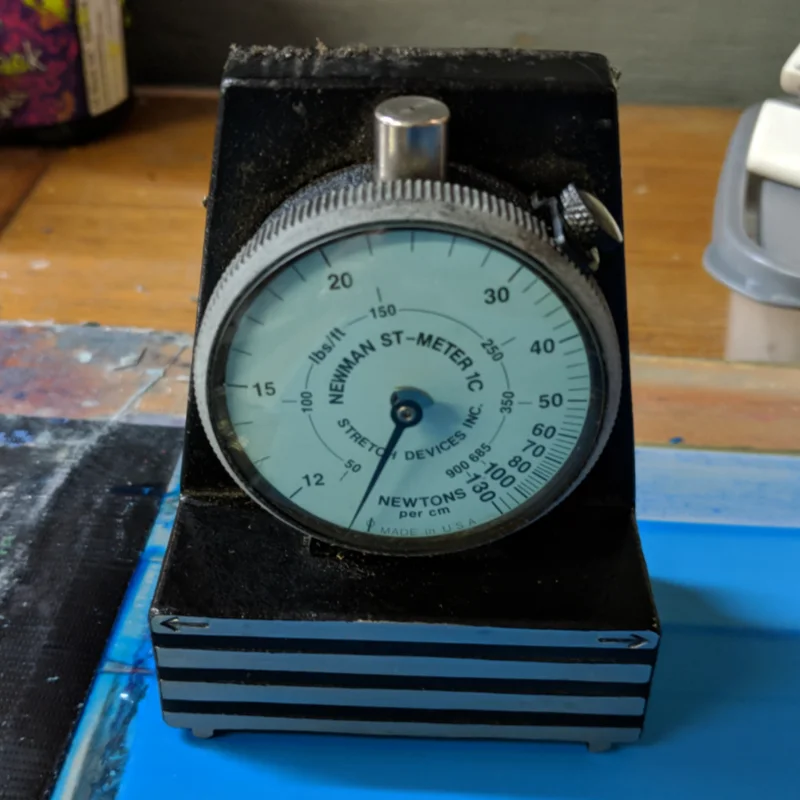
To measure tension, a calibrated tension meter is the device used.
This is a precise instrument and care should be taken to ensure the proper storage and use. The meter measures how much the screen fabric gives away when a downward force is applied to it. The downward force when measuring is gravity, and it uses the weight of the meter to calculate that movement.
For an analogy, think about how much a trampoline might give away if you are standing in the middle. For our screens, that deflection is expressed in Newtons per square centimeter. Yes, Newtons as in Issac Newton with this whole gravity and apple falling from a tree bit.
If you are using static frames, 25 N/cm2 would be an acceptable tension. For rentensionable frames, 35 N/cm2 is a good target.
How to Measure Tension
First, lay the screen on a flat table with the mesh side up. Measure the Warp (vertical direction) and then the Weft (horizontal direction) in the middle of the screen.
Like a tennis racket, the middle of the screen is the sweet spot.
It’s not hard to do and only takes a few moments. Then, measure each of the four corners, about a palms width away.
More expensive tension meters can measure tension bidirectionally, meaning the Warp and the Weft directions simultaneously. Less expensive tension meters only measure tension one way, so you have to rotate the tension meter each time.
You want to measure the center and the corners, and ideally, they are all about the same in tension. It is possible to have good tension with most of the screen but have one area fail due to any number of reasons.
Tension Floor – Set Some Limits
Your shop should have a floor limit on what is acceptable for tension.
The question that I’m asking right now is, “What is your minimum screen tension for your shop?” Do you even know?
My recommendation for shops is that any multicolor job should have tensions for all screens on the print run to be over 20 N/cm2. And, to ensure easier registration, all of the screens should be within 2 N/cm2 of each other.
For any screen that has tension under 20 N/cm2, they are relegated to only one color jobs.
I’ve seen shops set their minimum for one-color screen tension at 16 N/cm2, 17 N/cm2, or 18 N/cm2. It’s up to you…but this needs to be established. Personally, I’m a fan of 18 N/cm2.
Remember, this is the low end. The higher your tension, the better results you are going to get when printing.
Let’s examine that next.
Tension And Print Quality
Have you ever been at a trade show and marveled at all of those amazing prints on display? The print hand is incredibly soft, the colors vibrant, perfect and tight registration. Those prints are made with all different ink sets, presses, people, and shop environments.
What could be the one factor that links them together for print quality?
Those shops take incredible care to ensure that they are using the most well-made screens for those jobs. This is where tension starts to make you money.
Tight screens give you crisp, sharp edges. Prints are smooth, not rough. The ink sits on top of the shirt fabric, not driven through it like a nail, which influences opacity.
Tension matters.
Mesh Release
If you were to peak your head underneath the press when you are printing the shirt, you could see that when your squeegee travels across the mesh during the print stroke the screen mesh actually touches the fabric of the shirt for a quick instance. When the mesh tension is high, the mesh will snap back up instantly leaving the ink with a smooth finish on the substrate.
With low screen tension, the mesh touches the surface of the shirt longer. It doesn’t snap back fast enough. Due to physics, what’s left behind is a rough, bumpy print. When printing over an underbase, the top color could print irregularly and leave some small unprinted dots.
For multi-color jobs, because the low tension mesh has more contact with the wet ink of previously printed colors it picks up on the back of the screens. This causes opacity issues with printed colors, and sometimes blurry looking edges where the colors might touch in the image.
Poor Opacity
This causes poor ink opacity and leads to having to double stroke the print. Worse, many printers then feel obliged to add more squeegee pressure. The harder they crank down the print, they feel the more ink will be banged down onto the garment.
I’ve been to shops where every screen hit is a double stroke. Printers commonly blame the ink first, then the press.
That’s why for those printers it takes twice as long to print, and they use more ink as well.
It is incredibly common for print shops to blame everything but their poor screen room craftsmanship.
Here is something to consider. If ink or a particular press works for other people, but not you…maybe the problem isn’t with that product.
Are you really using it correctly?
Surfing the Mesh Wave
Another common problem is a combination of low-tension screens and too much squeegee pressure.
This creates a “wave” that travels in front of the squeegee during the print pass. This typically causes the ink to smear as the ink doesn’t drop down perfectly onto the shirt, but prints a little ahead of the squeegee.
At the edge of the image, this causes the ink to smear instead of having a crisp edge.
Ink Buildup
Plus, if you aren’t careful because the ink isn’t completely shearing through the mesh and onto the garment, it can build up in your screen.
This can prevent details from printing, or produce a blurry print.
Great Screens Make You Money
Here’s a concept that I want you to consider. When your screens are perfect, everything is easier on the print floor.
You don’t have to double stroke on an automatic press to get opacity.
Screen registration is a breeze.
That saves time, and time, as we all know, is money.
Plus, on the money side, every time you double stroke your ink you are using twice as much ink to get the same result.
Why not focus that time and energy instead of using a band-aid and correct the problem?
Good screen tension is the start of that.
Some Math
Let’s say that your opportunity cost for your press is at $300 per hour. For some shops, that’s too low, but for this example, it is a good conservative number.
$300 per hour is equal to $5 per minute.
As everyone probably knows I like screen setup time to be under five minutes per screen. But, let’s say we’re dealing with that example shop mentioned before. They were around ten minutes per screen for their set up on average because nothing was lining up.
After adjusting their workflow to take screen tension into consideration, they got their setup times down to about 6 minutes per screen. That is a four-minute per screen savings.
Like a lot of shops, they average about three screens per job and print about ten jobs per day.
So that can be expressed as 3 (screens per job) x 10 (jobs per day) x 4 (minutes per screen savings) x $5 (opportunity cost per minute) = $600 per day savings.
Per press.
Every day.
So, tell me again how you don’t have time to measure your tension?
Last Word on Screen Tension
This isn’t anything new, is it? Hopefully not, but there are plenty of people posting online in groups or forums that don’t comprehend the importance of screen tension.
I’m not trying to make fun of them or anything. There are plenty of resources out there to learn how to improve your techniques in this industry.
So, as people love checklists I’m going to offer one.
- Regularly use a tension meter. If you don’t have one, buy one. Learn how to use it.
- Design, as part of your screen room workflow, when the tension should be measured for your screens. Who is doing it? When are they doing it? How are you recording it on the screen?
- Set a minimum shop tension level. This is the lowest level screen tension that you will use in your shop. Train your staff on what this means and why you have it.
- Train your staff. Screen room crew certainly, but your print and art staff as well. Illustrate what success looks like.
- Reach out to your suppliers for help. You can get better screens. Training is available too. Don’t be in the dark.
- Don’t make excuses. “It’s how we’ve always done it” is not a valid reason for not having best industry standards in your shop.
As my friend Alan Howe with SAATI is always fond of saying. “Screens are equipment”.
Treat them as such.
“The most difficult thing is the decision to act, the rest is merely tenacity. The fears are paper tigers. You can do anything you decide to do. You can act to change and control of your life; and the procedure, the process is its own reward.” – Amelia Earhart
“You can’t build a reputation on what you are going to do.” – Henry Ford
“If you don’t like how things are, change it! You are not a tree.” – Jim Rohn
Clear Expectations
Click the button to book a 30-minute call with me. Let’s discover how I can help you solve your biggest challenges!
[av_button label=’Book a 30-Minute Call’ link=’manually,https://atkinson.fyi/30minutecall’ link_target=’_blank’ size=’x-large’ position=’left’ label_display=” icon_select=’no’ icon=’ue800′ font=’entypo-fontello’ color=’theme-color’ custom_bg=’#444444′ custom_font=’#ffffff’ av_uid=’av-pfxo6z’ admin_preview_bg=”]


1 comment
Amdy
This is very true, I have been screening for over 30 years, and would you believe, just in the last few months, I learned about screen tension, thanks to you, I worked for a guy for those 30 years, we print on vinyl material. Started with wooden frames, now owner passed a few years ago, leaving me to work for another company. All new printing presses, I has problems keeping registered. Read your article about tension, sure enough, now all my prints are on the button, and clean. I always thought it was something I was doing wrong, like missing guides, too much pressure on squeeze. Only time I had a good print,was just a few months after a new screen was made,then over time, that screen wouldn’t registered. Life so much better now,knowing all those years it wasn’t me. Thanks for writing this article.